![]()
Copy a row and its underlying structure
Changing the 'Structure id' by altering the structure of the tree
Tag code based on tag code format
In this window its possible to create a tree that can contain product and tag information.
This can be done by adding sub-rows, and drag /drop the rows above/below each other. Each row or sub-row can have a product and tag information.
If a row is created, a product can be assigned by selecting a product from the dropdown list. When a product is selected. a 'new' product is assigned to the row which inherits all the modules, attribute, I/O etc, from the library. After selecting a product, the product can be configured in the 'Product Details' detail window. In this window it is possible to set the appropriate variant and options. With the help of detail window you can navigate trough the attributes, I/O items and modules of the selected product. This way, you can fill in attribute data for example. If you want to fill in a large amount of attribute data, we advice to use the Engineering window.
In a project there is the reference id. this is a unique number for every structure which will/can never change in the project. This is mainly used for importing data in the engineering screen or the project structure screen.
Note: By default not all columns are shown. Please look inside the column chooser for other possible columns.
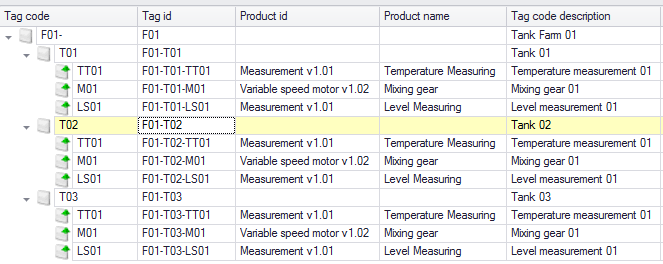
Example of a flat tag list

Example of a Product structure
Icons
|
Row without a Product. |
|
Row with a Product but without a selected Variant. |
|
Row with a Product and with a selected Variant. |
See also:
Click .
Select a new row or new sub-row.
Optionally give it a unique tag id.
Select a product by selecting it from drop down list.
When a row is selected and a new row is created, the new row will be added on the same level as the selected row.
When a row is selected and a new sub row is created, the new row will be added as a sub row of the selected row.
New sub row can be created, with a maximum of 10 row nested inside each other.
When a product is selected, any newly added sub-products are marked with a 'green' color.
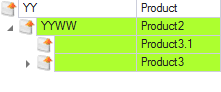
When adding a new product (with or without sub products) the previous 'green' sub-products will no longer be 'green'
Notes:
The Structure code cannot start with 'Hardware product'.
The Structure code must be unique within its own level.
The Tag id must be unique.
If the newly selected product has sub products in the library, these sub products are automatically added. If the structure code of a sub product results in a duplicated structure id, the structure code is not transferred from library to project.
Click .
The selected row and its underlying structure will be copied.
The copied structure code gets the text ' - Copy (x)' attached to it as a suffix, where 'x' is the number of copies made.
The copied tag id gets the text ' - Copy (x)' attached to it as a suffix, where 'x' is the number of copies made.
Select the row(s) to delete.
Click .
Click in the message dialog.
It is possible to delete multiple products without changing the structure. This can be done by:
Select the row(s) to delete.
Right-click and select .
To change the structure, simply drag them up and down the tree. By doing so the structure id is automatically changed.
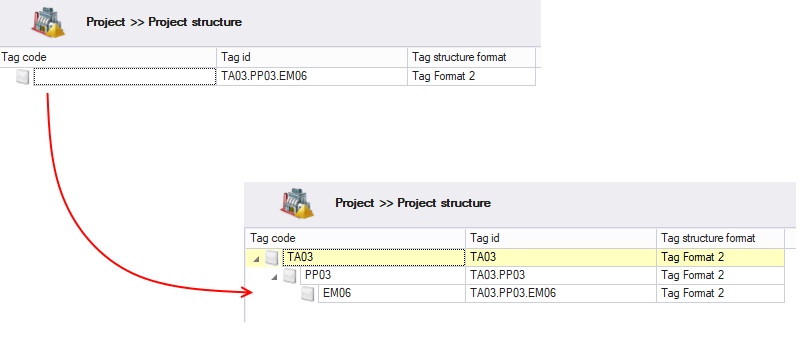
The structure id is an id that is created based on the position in the tree in combination with the structure code.
If a value is entered in the structure code, that value will be used to identify/create the id inside the structure id.
The structure id is always separated by a '.' (dot) and can therefore not be used inside the structure code.
See example:
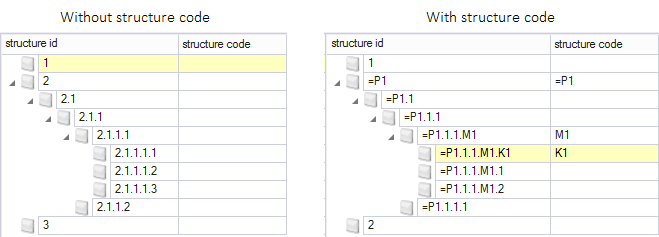
In the above example you see that the structure code 'M1' replaces the old value of '1' in its own structure id and the items below it.
Structure id changes when:
1. Structure code is changed.
2. The item/row is moved to a different place inside the tree. This can be done by adding a new row before the current one of by moving the current row.
It is possible to receive the library configuration of the selected variant and options of a product. This means that if a product is defined with a variant and some options and the configuration of these variant and options are changed in the library, the configuration of the product can be updated with a right click and . The selected product will receive and set the configuration of the variant and options from the library. Selection of multiple products is possible.
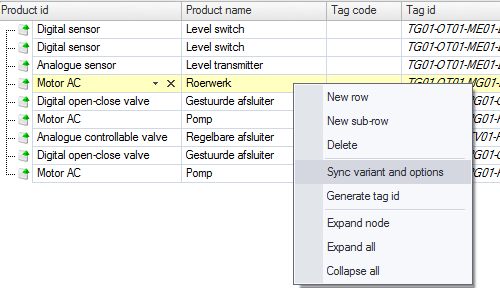
NOTE: When clicking 'sync variant and options' on a row that has children, a message is shown to include all children (and their children and so on).
The tag code can be edited manually, but it is also possible to select it based on the selected Tag code format. When the tag code name contains an numeric placeholder ('#') the placeholder will be selected simply replaced by the user with the correct number.
The tag id can be edited manually, but it is also possible to generate it, based on the selected Tag structure format. This can be done by using the right click option on a row (multiple rows can be selected), and clicking 'generate tag id'. The tag id is generated conform a format.
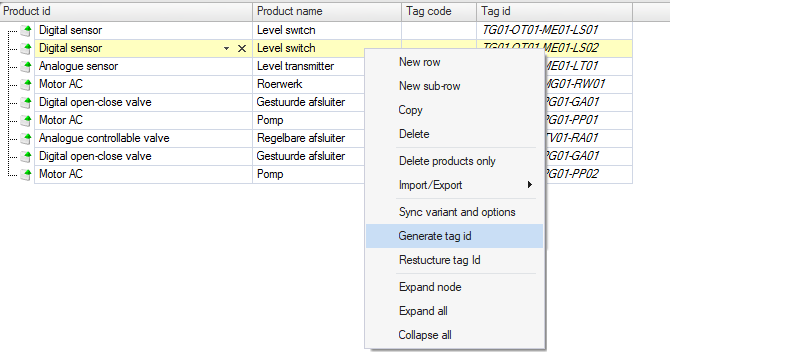
It is also possible to restructure the tag id, which will find/create a the new structure for a new tag id. This could be very useful if a tag id is given into a single row, but is actually multiple levels. Or when a tag id is changed and therefore must be relocated.
Notes:
In detail window ‘Product details’ you can configure the selected product. In here, you can set variants, options and a description. Variants and options can also be selected in the grid directly. If you select a variant (and options), the corresponding modules, typicals and attributes are automatically selected and with a few mouse clicks your product is fully configured. Optionally, if the variants and options don’t cover the configuration, you are able to configure your product here manually. This can only be done if the 'Edit mode' is enabled. When the 'Edit mode' is enabled each items can be selected or deselected in de detail grid.
The left side of the detail window ‘Product details’ shows the configuration of the product. From here you can navigate through all the attributes and modules which are selected for this product. The right side of the Detail window ‘Product details’ shows different content, dependent on what you select in the tree. For an example, if you click on the ‘Attributes’ icon, it will show all the attributes of the product in a grid. Here you can edit the values of the attributes. The tree will only show the items that are selected in the variant/option configuration. for an example, if the product has no attributes, or not a single attribute is selected, the 'Attributes' row will not be visible.
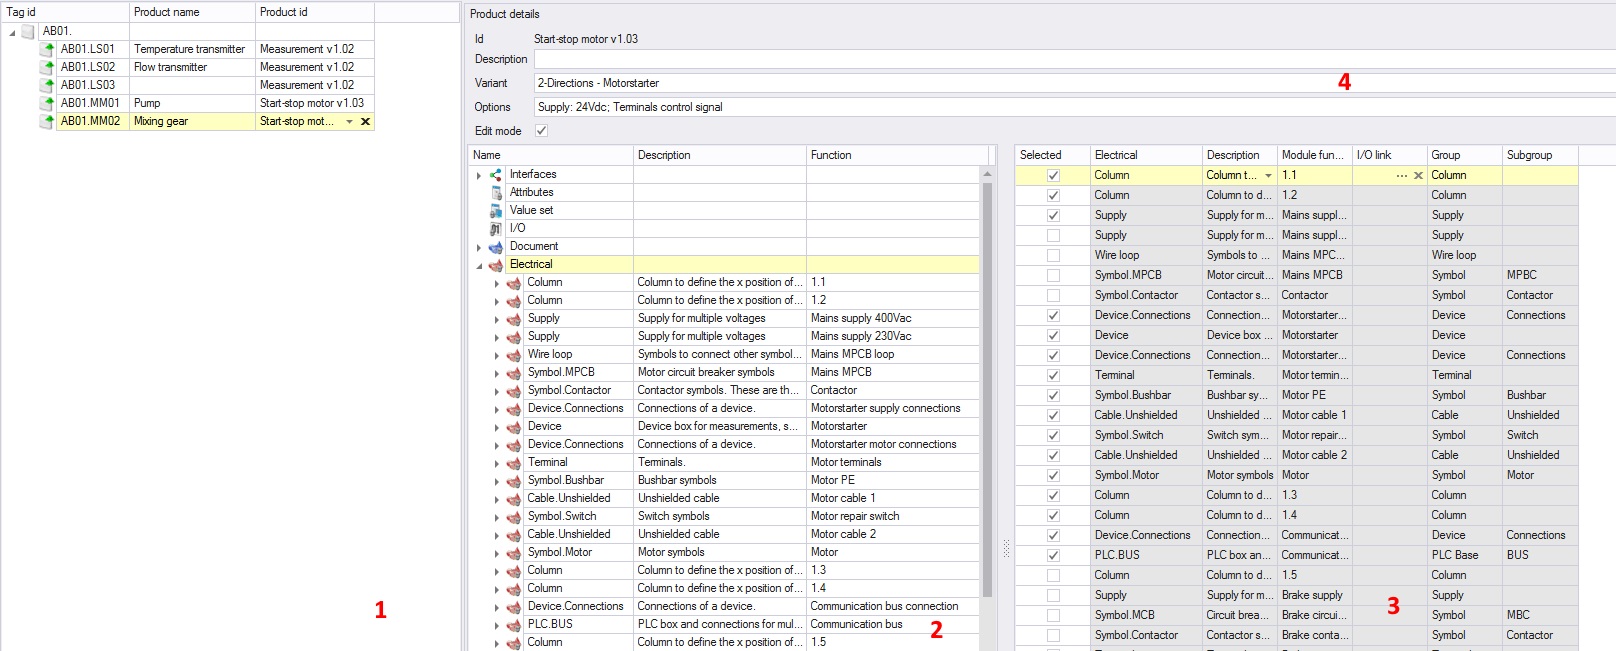
Here you can create a structure of the project, a structure row can have a product.
Here you see the actual configuration of the product.(Only the items that are selected in the configuration are shown).
Here you can modify values of the product (e.g. attribute values).
Here you can configure the product.
In the library you can add a description
to a variant and option. This description can be useful to select the
appropriate variant/option(s) for a tag. This description shows up when
you move your mouse over the variant or option.
As said before, dependent on what you select in window 4, window 3 will show different kind of data. Document/logical/scada/electrical modules with an I/O-link only appear in detail window 'Module' when the document/logical/scada/electrical module and it's related I/O item are selected both.
See also:
It is possible to import a project structure based on a tag id, based on a structure id or base on a reference id.
This import is done by using an Excel file.
To Import products:
In the pop-up window click .
Browse for an Excel file to import and click .
Review changes and click to accept them or to cancel the import.
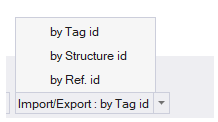
Clicking the main button will start the import/export for the last chosen import/export type. When clicking the arrow on the right side of the button.
Any import/export type can be chosen, this will be saved in the user settings.
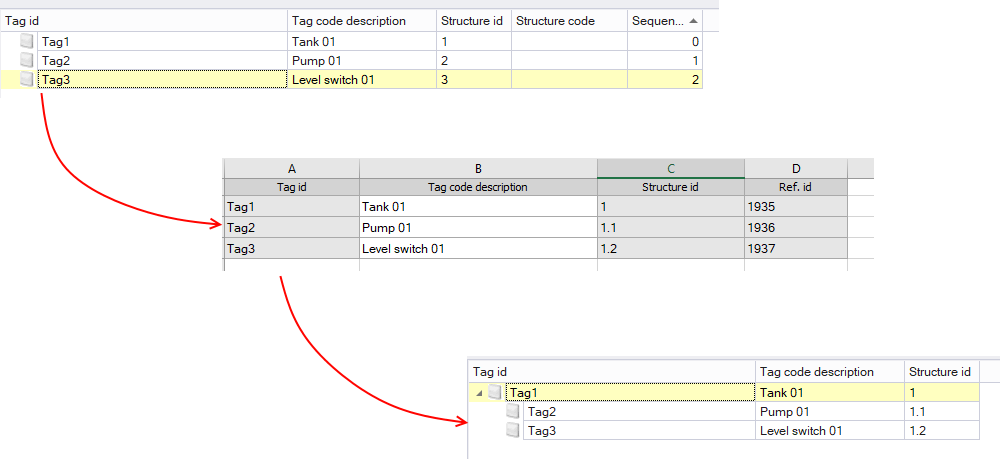
Importing by tag id will create a structure which can be defined in the Tag structure format in library.
For example import see: Example Tag Id Import.
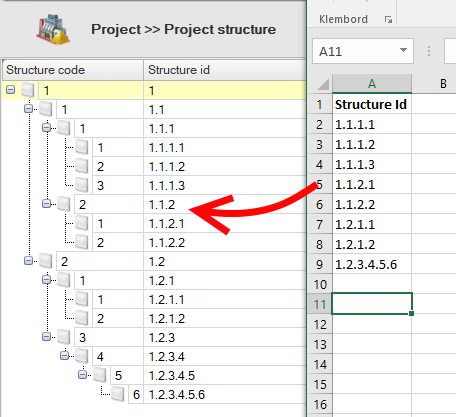
Importing by structure id will create a structure which is separated by a dot '.' each dot will be an new level in the structure.
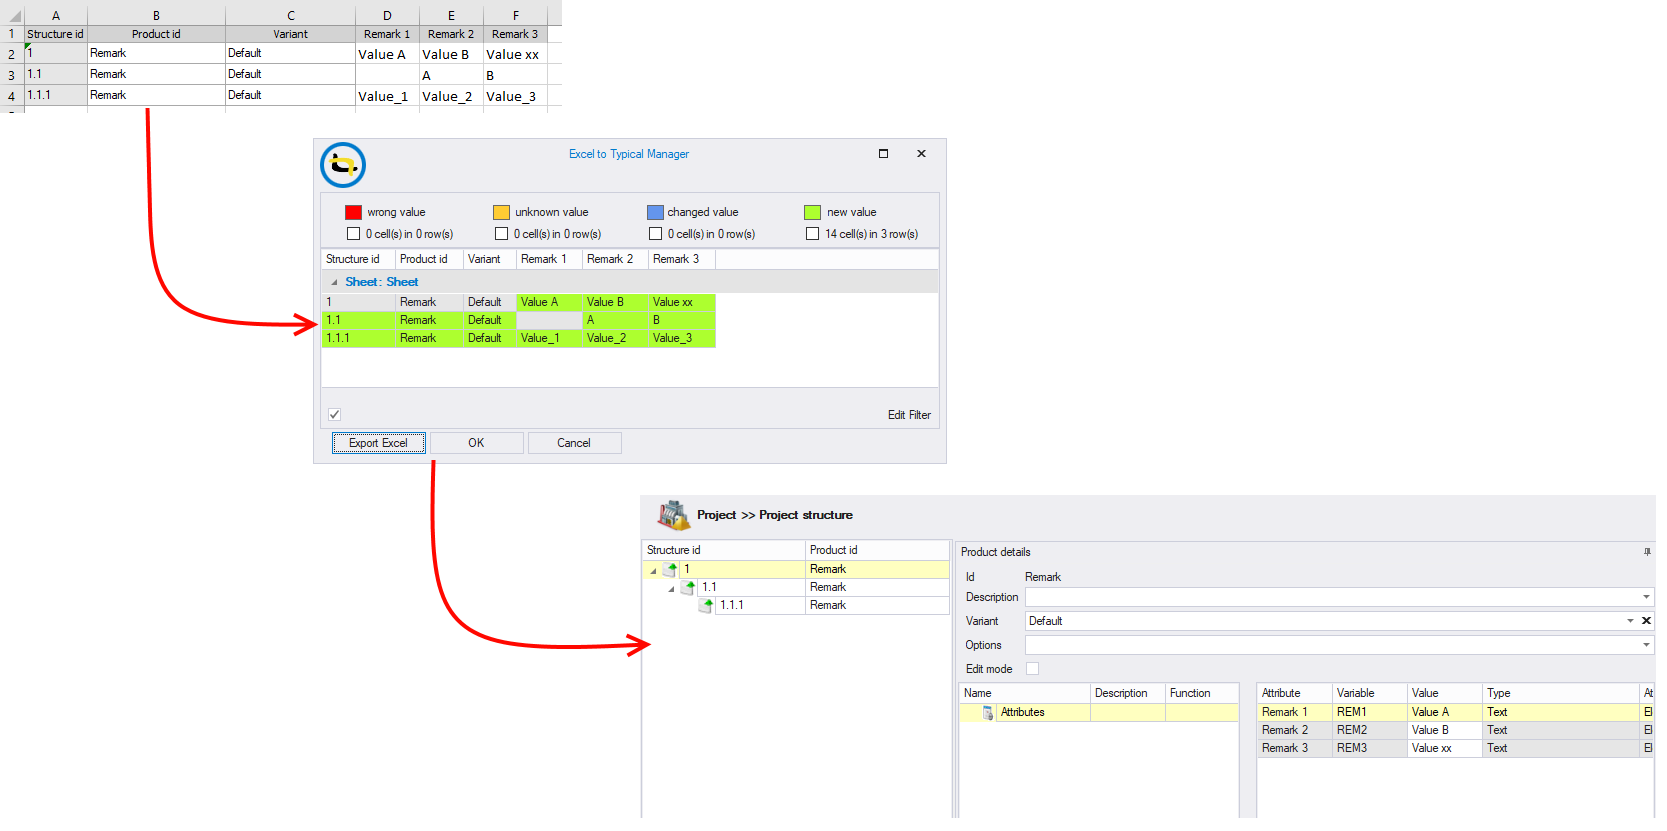
See example (from Excel to Typical Manager)
When importing by Tag id it is possible to import the flowing values:
When importing by Structure id it is possible to import the flowing values:
When importing by reference id it is possible to import the following values:
NOTE:
When changing the structure id or tag id, the project structure will not be changed (the product is not moved within the structure)
When importing a new product with variant of options, if the variant or options is wrong. The variant or option will not be set, also the default will not be set.
When importing a variant and the imported product is wrong, the variant is also wrong.
When importing a options and the imported product or variant is wrong, the options are also wrong.
When importing a product that has sub products in the library, these sub products are automatically added. If the structure code of a sub product results in a duplicated structure id, the structure code is not transferred from library to project.
When importing a panel that does not exists, the user is prompted if this panel need to be created.
When importing a panel that panel will also be related to the sub-products specified in the library with the imported product
See also:
It is possible to import changed attribute values within the same import in any project structure import.
This can be done by adding Attribute columns to the imported file, the attributes will be validated in the same way as in the engineering view
It is only possible to import attributes from a product, it is not possible to import attribute values directly into module (electrical, logical ect.)
See also:
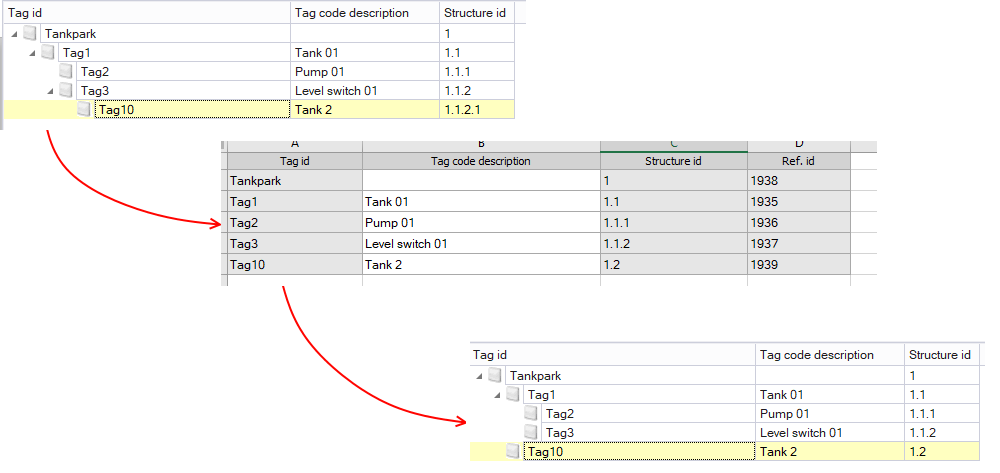
It is possible to import a changed project structure by importing the structure Id, (by using Import by Ref. id)
In the images below, different examples how an import will change the project structure.
Moving project rows (tags) Into an parent.
Moving project rows (tags) in a different position in the structure
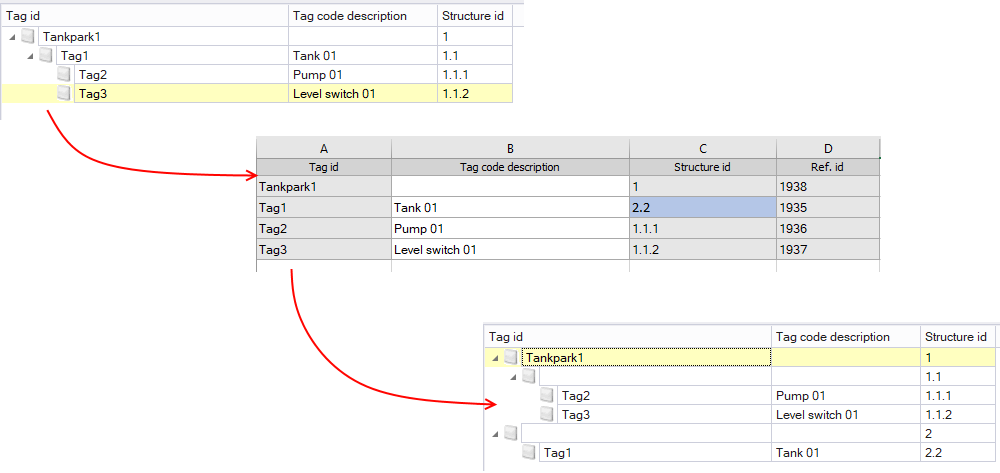
Moving tag out of a structure, without the remaining tags to be moved (note the 2 project rows created to do so)
See also: