![]()
Allowed I/O types vs. selected I/O type
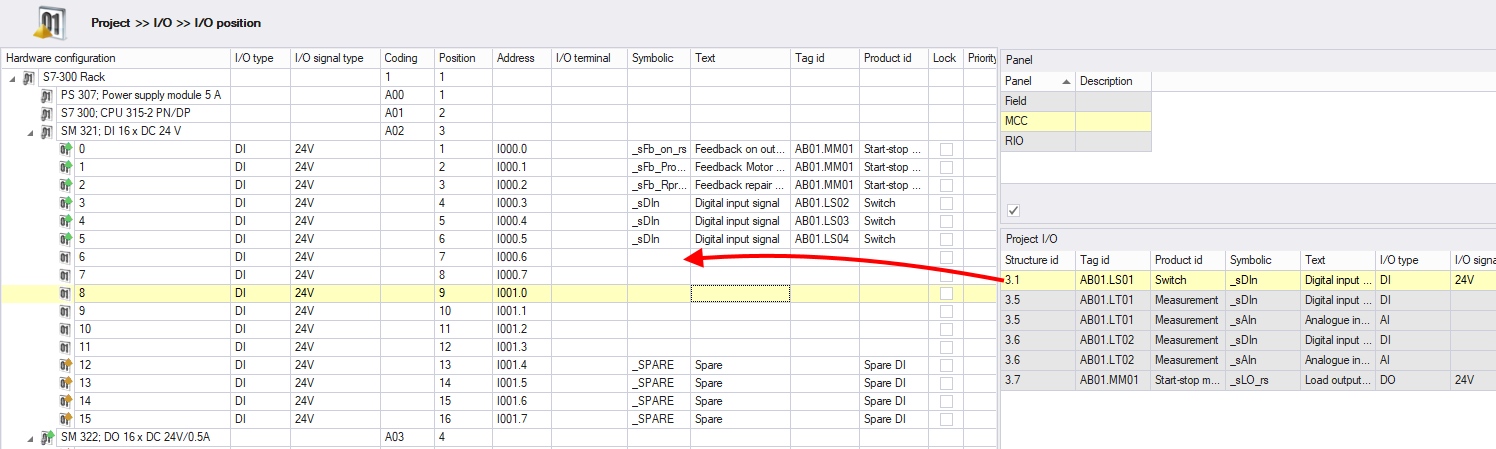
In this window, all the I/O modules of the current project are available and can be divided over the I/O units. This can be done manually or automatically.
By drag drop an I/O from the detail window 'Project I/O' on an I/O position in the main window (multiple select is possible) it is possible to add I/O manually.
I/O modules can only be linked to an I/O channel if the I/O type and I/O signal type from the module is allowed in the I/O channel.
Divide I/O
In the same detail window, a 'Divide I/O' button is available. When clicking this button, Typical Manager will divide all the project I/O automatically on the available I/O units. If insufficient I/O units are available, a message will be shown and the automatic dividing will not be processed.
If you want to change the position of an already placed I/O module, you can just drag and drop the I/O module on another position or another I/O unit. Multiple select is possible.
Dependent of which panel you choose in detail window 'Panel', the I/O units connected to that panel are showed in the main window and the project I/O connected to that panel is showed in detail window 'Project I/O'.
It is possible to lock the I/O modules which are already placed. This means that the locked I/O module can not be deleted or overwritten by other I/O modules. You can do this by selecting one or more I/O modules, clicking the right mouse button and click Lock.
Different Icons in the I/O position tree have different meanings:
 : An I/O channel is unassigned
 : An I/O is assigned to the channel but is a spare I/O
 : An I/O is assigned.
See also:
After dividing all the project I/O, the I/O can be addressed. This can be done automatically or manually one by one. It is also possible to import the I/O addresses ('Import/Export' button).
Address automatically
For automatically address all the I/O, you must select a CPU (usually at the begin of a rack) to address all I/O on all units or just one I/O unit to only address the I/O on that unit. With the button 'Address' a pop-up window shall appear. Here you can choose an I/O format and optionally you can fill in the start addresses. If you have selected a CPU, the start addresses are already filled in from the library.
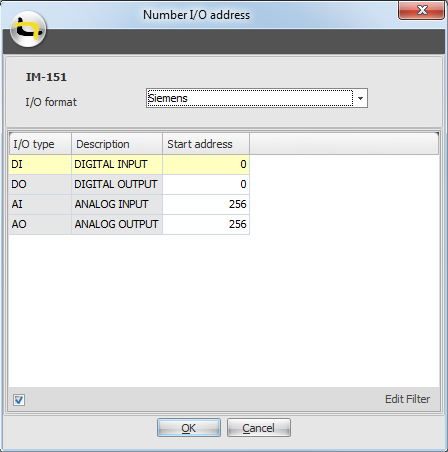
Clicking OK will start the addressing.
Notes:
1. Only fully configured I/O formats are shown in the drop down list. I/O formats can be configured in Library >> I/O >> I/O format.
2. For addressing I/O types are used.
If you automatically address the I/O in the picture above, you get the following result:
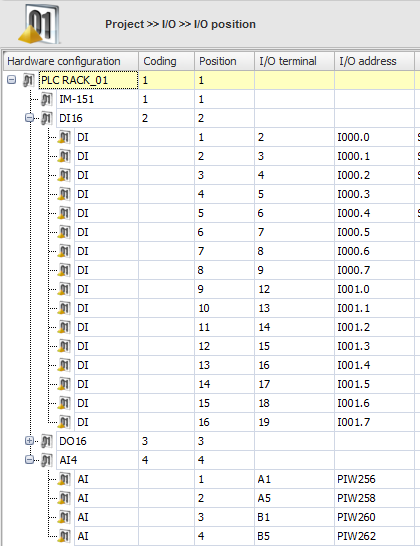
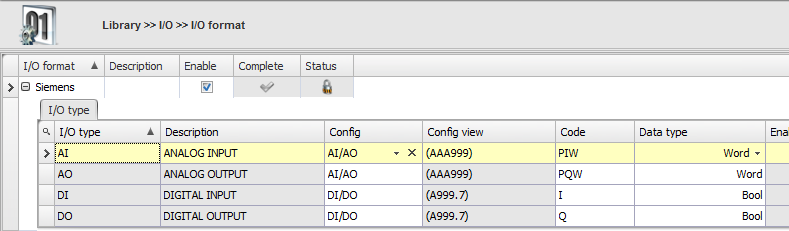
For this situation, we have used the following I/O format:
See also:
In the library multiple "allowed" and "preference" I/O types and I/O signal types can be selected per I/O channel. This is shown as:
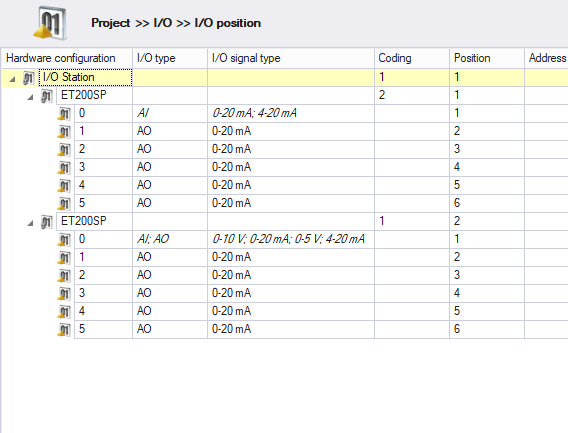
On the first unit the first channel has a preference configuration applied. The I/O type and signal type are in italic, which means it is not selected by the users, only the configuration set as a preference are shown, and only the preference configuration will be used when dividing I/O (manual or automatic).
On the second unit, the first channel has an allowed configuration applied. Here as well, the I/O type and signal type are in italic, and all configuration that are allowed will be used when dividing I/O (manual or automatic).
A definite I/O type and signal type can be selected manually. There are two options for selecting it. The first option is by selecting the correct items via the dropdown menu's. The second option is by selecting (multiple) channels, right-clicking and selecting 'Select I/O (signal) type'. This can also be used to set the I/O (signal) type configuration for multiple I/O Channels.
Notes:
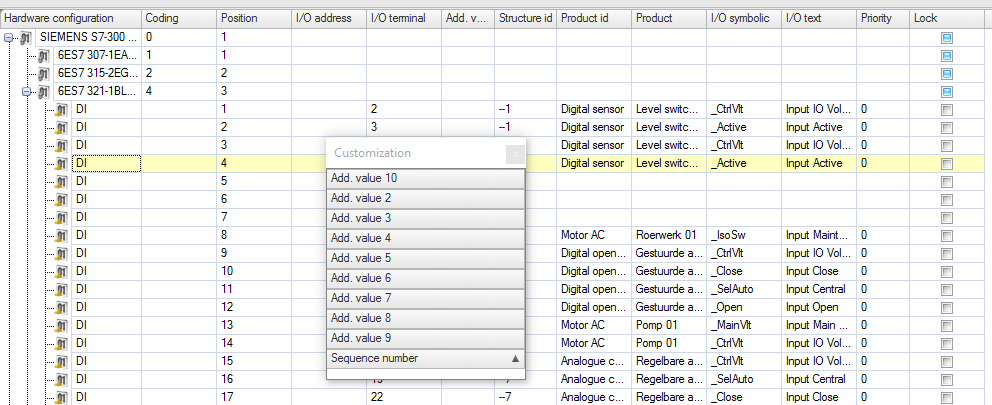
It is possible to add a terminal and additional values to I/O types and I/O signal types that are linked to an I/O Unit or I/O CPU. Additional values can be used in various situations to store additional data per I/O channel. Examples of additional values:
Analog terminal coding. Analog in- or outputs have multiple terminals. Additional values can be used to generate these terminals.
Per channel, per I/O type per I/O signal type on an I/O unit, 10 additional value fields are available. The additional values are also available as System variables.
It is possible to import I/O addresses through an Excel file.
To import I/O addresses:
Click .
In the pop-up window click .
Browse for an Excel file to import and click .
Review the changes and click
to accept them or to cancel the
import.
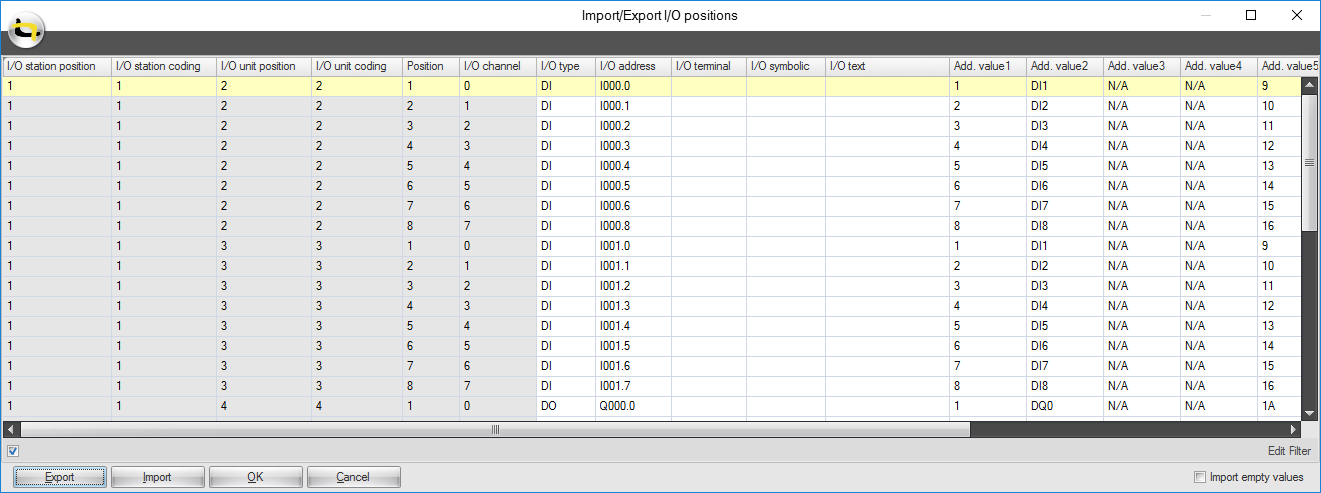
As seen in the image above, the I/O Position tree is converted to a table that can be exported to an Excel file. Using the Import/Export functionality, it is possible to import the following data:
I/O type.
I/O signal type.
I/O address.
I/O terminal.
I/O symbolic
I/O text.
Additional value 1 to 10.
NOTE:
I/O symbolic and I/O text can only be imported if an I/O is assigned to the I/O Channel, as these values are set in the I/O Module.
See also: