![]()
The tutorials of this section cover the navigation-related features of the Report Designer.
This section consists of the following tutorials.
This tutorial describes the steps to create a report with bookmarks (a so-called Document Map). This feature allows you to easily navigate through the report during print preview.
To demonstrate the Document Map feature, we'll use a report with grouping, similar the one created in the following tutorial: Change or Apply Data Grouping to a Report.
To create a report with bookmarks, do the following.
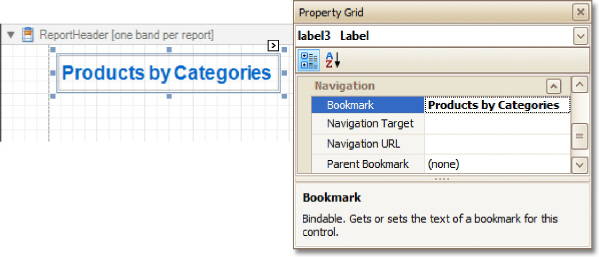
1.Click the Label in the Report Header band, to select it, and in the Property Grid, set its Bookmark property to the same value as its text (i.e. Products by Categories).
2.Now, select the Label in the report's Group Header band. As this control is bound to data, we will bind its Bookmark property to the same data field, using the (Data Bindings) property.
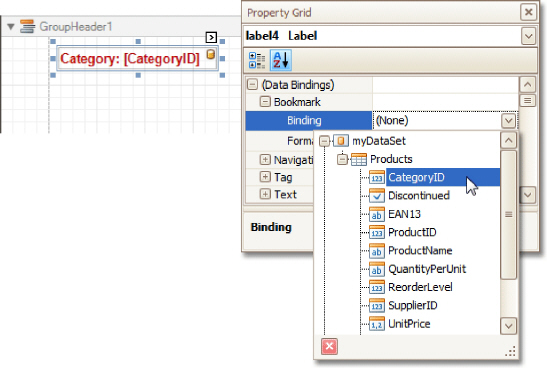
Note that as with other bindable properties, you also can apply value formatting to the Bookmark property (e.g. Category {0}).
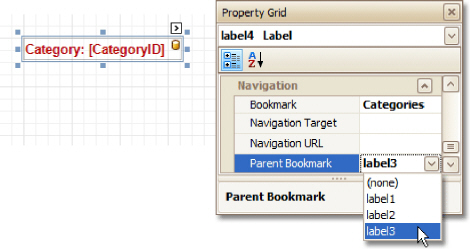
3.Then, for this Label, specify its Bookmark, and set the Parent Bookmark property to the Report Header's label, to define the document map's hierarchy.
The report with bookmarks is now ready. Switch to the Preview Tab, and view the result.

See Also
This tutorial demonstrates how to embed a hyperlink into your report.
Note that a label will behave as a hyperlink both in a report's Print preview, HTML preview and when the report is exported to PDF, HTML, MHT, RTF, XLS and XLSX formats.
To insert a hyperlink into your report, do the following.
2.Drop a Label onto the report, and in the Property Grid, change its Text to the one required for the link.
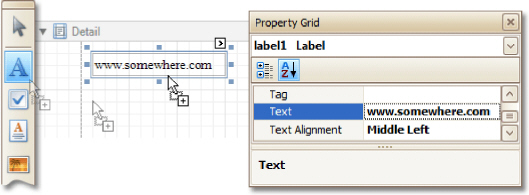
In addition, to make the Label look like a typical link, you can change its appearance appropriately (e.g. make it blue and underlined).
3.Now, set its Navigation Target to the required value (_blank, _parent, _search, _self, or _top), and define the required Navigation URL.

The hyperlink is now ready. Switch to the Preview Tab (or, HTML View Tab), and view the result.
![]()
See Also
This tutorial demonstrates how to add a cross-reference to your report. A cross-reference is simply a link whose target is located within the current document, which allows you to establish easy navigation through a report. In this example, we place a link at the bottom of each group, leading to the beginning of the report.
To demonstrate this feature, we'll use a report with grouping, similar the one created in the following tutorial: Change or Apply Data Grouping to a Report.
To create a report with cross-references, do the following.
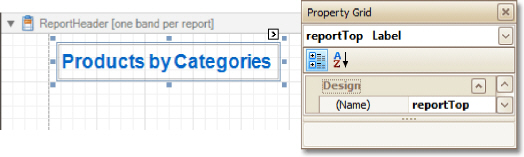
1.Drop a label onto the created ReportHeader band, which will serve as the report's headline. Click the label, to type the desired contents into it. Then, in the Property Grid, set its Name property to reportTop.
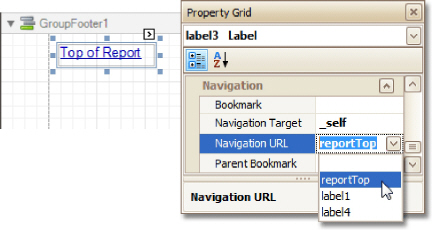
2.To accompany the existing Group Header with the corresponding Footer, in the Group and Sort Panel, check the Show Footer option.
Then, drop a label onto it. As it will be the link, change its Text to Top of Report, and apply the desired formatting to it (e.g. the blue color and underlined text).
Set its Navigation Target property to _self. Then, if you click the drop-down list of the Navigation URL property, you can see the controls available in your report. Choose the one named reportTop.
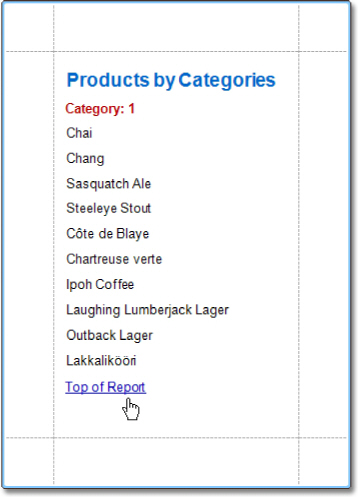
The report with cross-references is now ready. Switch to the Preview Tab (or, HTML View Tab), and view the result.
See Also