![]()
Creating electrical location tree
The electrical location is used to create the electrical drawings. Each product which is added to the project can contain electrical typicals. These typicals will be added to the list with project typicals in detail window 'Project typicals'. These typicals have to be placed on pages in the desired structure and sequence. This can be done manually or automatically. For automatic organization of electrical typicals read this topic. For manual placement of typicals the procedure below can be followed.
A file viewer is available for showing the electrical drawings.
A tree like structure can be created by using the six location levels which are present:
The electrical location tree can be created by drag and drop location levels from detail window 'Location levels' onto the main window.
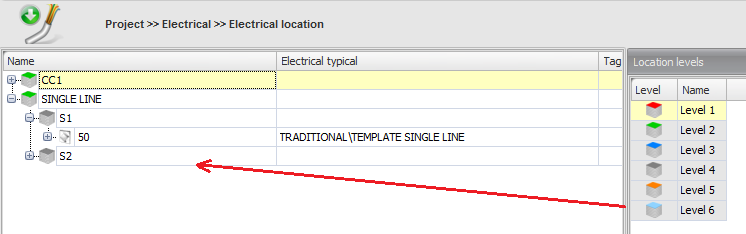
Typicals can only be placed onto templates. (pages). All the templates which are made in the library are available to be dragged/dropped onto the electrical location tree.
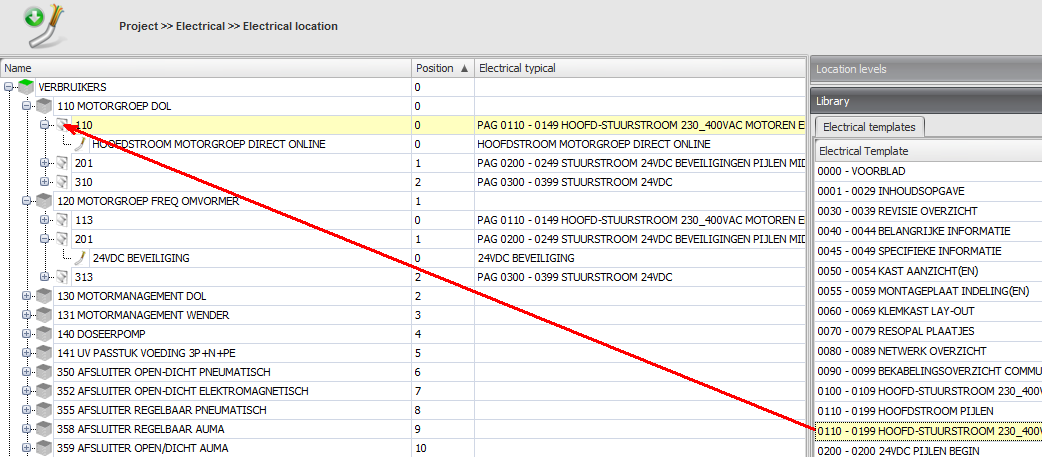
When adding a template a pop-up window will appear. In this window it is possible to add multiple templates at once.
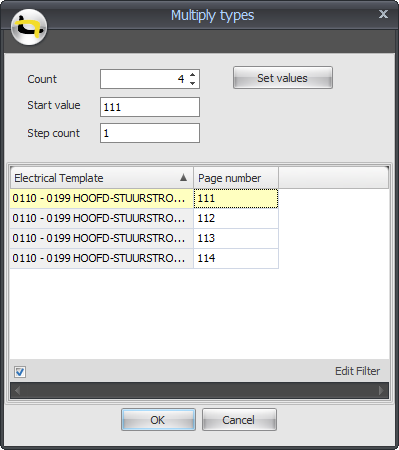
For an example: if you want four templates of the same type:
If you click on a template in the location tree, the attributes of the template (if available) are showed in detail window 'Template details'.
If the lock box on a template is selected this template cannot be removed any more. However the typicals inside the template and the location levels can be removed and the template will be removed if the levels above it are deleted.
Also it is not possible to change or add typicals in this template.
Once the electrical location tree is ready you can drag/drop the project typicals from detail window 'Project typicals' onto the electrical templates which are present in the electrical location tree. When all the project typicals are divided on the electrical location tree, the project is ready for generation.
If you click on a typical in the location tree, the configuration of this typical is showed in detail window 'Typical configuration'.
Automatic divide
It is possible to create a tree like structure and place all the project typicals automatically. Therefor you need to configure an electrical location format and select this location format in your project settings. After that, you can use the Divide button to divide all the project typicals. You can choose if you want to divide all the typicals or only the selected typicals and in which sequence you want to divide the typicals. For more information about automatic dividing we refer to organizing automatic divide.
By sorting
By sorting will divide (all or selected) typicals by the sorting reacted in the grid. The 'Default sorting' found in the right mouse menu, will order the typicals, first all typicals from hardware products then the typicals from project products. For each product, typicals are ordered by module sequence number then typical sequence number.
By I/O Position
Dividing by I/O position will order the typicals, first all typicals from hardware product then the typicals from project product then all typicals which are linked to an I/O.
I/O linked typicals are ordered by the I/O position (Unit -> station -> Panel)
For each product, typicals are ordered by module sequence number then typical sequence number.

Notes:
1. The order of the typicals determines the position on the page. (When using horizontal or vertical placing of typicals)
2. Only selected/enabled electrical typicals of enabled/selected electrical modules are listed in this detail window. If an electrical module has an I/O link, this I/O item also must be selected/enabled.
Each template on an electrical location needs a unique page number. With the Import/Export button page numbers can be exported and imported.
Note:
The export uses the Excel template given in the options. Found in System >> Options >> Company standard >> Report
For more information see: System Options
Example
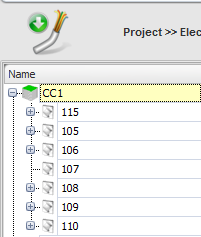
For example, we have the following electrical location:
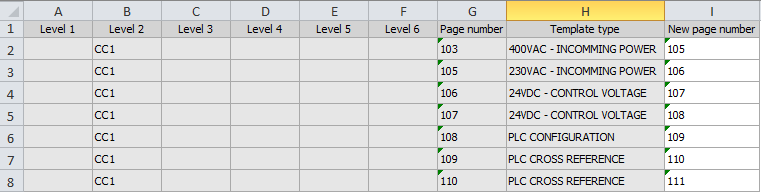
And we want to import the following Excel sheet:
We get the following 'Excel to Typical Manager' pop-up window:
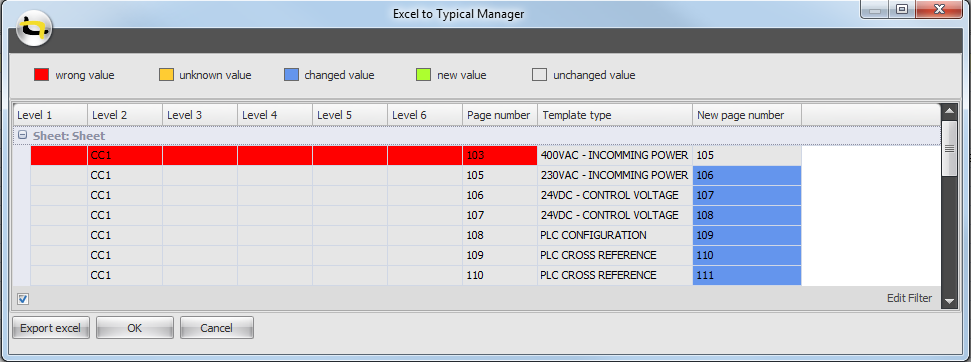
The first row is colored red, because there is no template on the electrical location with page number '103'. So, this is why this 'key value' is colored red. If we now click the OK button, the new page numbers with a 'changed value' color will be imported.
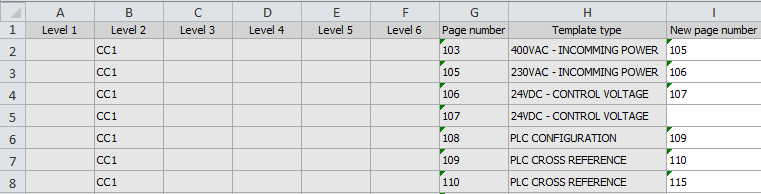
We do not import the above Excel sheet. Instead, we want to import the following Excel sheet:
We get the following 'Excel to Typical Manager' pop-up window:
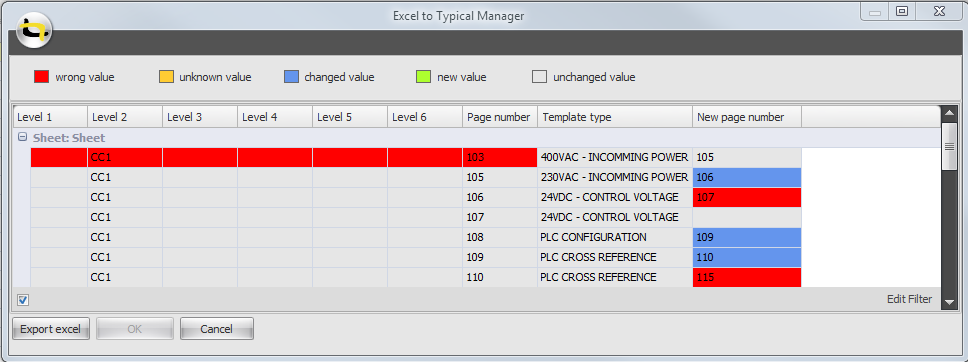
Value '115' can't be imported, because location 'CC1' already have a template with page number 115. Value '107' can't be imported, because that will result in a duplicate page number on this location (location already contains a template with page number 107). Because value '107' can't be imported, value '106' can't be imported either. However, this value is not colored red, because value '107' is the cause for not being able to import value '106'.
The OK button is disabled now, because there are some wrong values. The OK button will only be enabled if there are no wrong values to import. This functionality is a an exception to other import windows. In other cases of importing data, like importing attribute data, the OK button is always enabled.
See also:
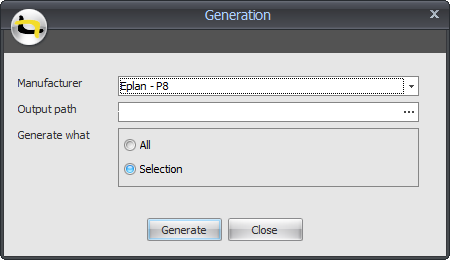
To generate the (partial) project follow the steps below:
Select part of the electrical location tree which needs to be generated
Press the Generate button
Select Manufacturer (Eplan/Autocad/See Electrical), output path, generate all/generate selection.
Click Generate.
Click OK
in the dialog to open the generated Excel file or Cancel
to close the dialog.